Web Smarts - Business Savvy
We’ve been building websites since 1998
We are trusted advisors to Over 50 Active Clients within several industries including associations and nonprofits, healthcare, financial services, retail, B2B and more.

We Are
Trusted
Partners
After we deliver a quality website on time and within your budget, we will be there for when it really counts. We will be proactive, consultative and strategic after we launch your website.

We Are
Integration
Experts
We’ve integrated with virtually every AMS system on the market as well as most LMS, publication, advocacy and career center applications. Our company was founded on custom development.

We build websites that are easy to edit, manage and design using the best content management system on the market, Sitefinity CMS.
We Provide A Full Spectrum Of Services


Our Clients Are Our Partners....
John Wurm

The team at Vanguard helped us think about our digital presence from the perspective and needs of our users, while holding true to the values our organization espouses.
Connect With Us
Improve Your Webcopy
Sitefinity 13

The
Vanguard View
Technology articles about one topic from the perspective of Leadership, Marketing and IT professionals .
Configurable Settings when Creating a Sitefinity Form
One of Sitefinity’s most powerful features is its Form Builder. The Form Builder allows you as the website administrator to quickly create a form and capture information from you website visitors to learn more about them.
The advantage of utilizing the Form Builder is that Sitefinity CMS by default includes a wide array of configurable fields making the form creation process much more streamlined. Some of the included fields are;
- Textbox
- Radio Selection
- Dropdown List
- Date Selector
Although creating and configuring a form in Sitefinity can be done with a few mouse clicks, there are several configurable options that you need to know before creating your form.
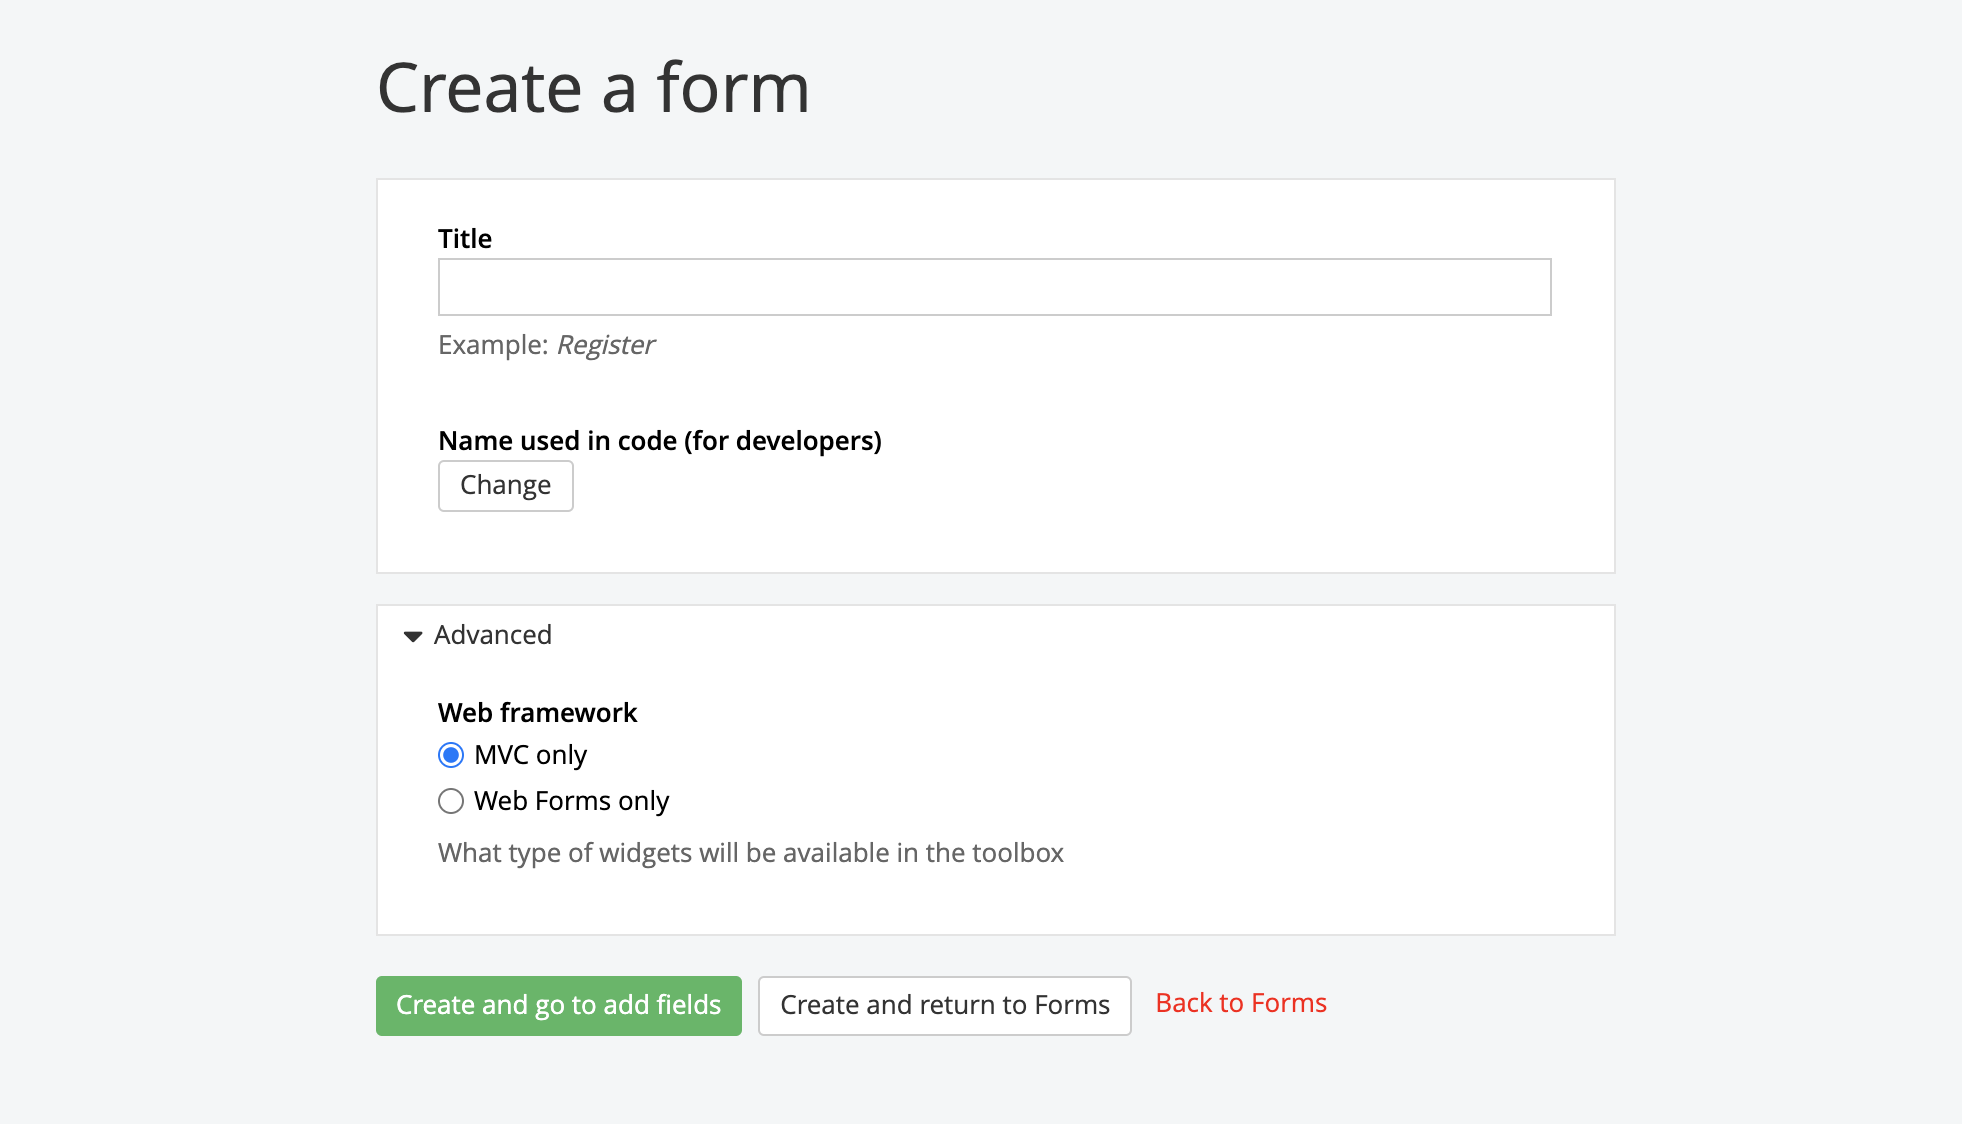
MVC vs. Standard Web Forms
Sitefinity CMS introduced the MVC framework in its version 8 release. MVC is broken up into three elements; the “model,” “view,” and “controller.” This framework is built on ASP.NET and is utilized for the creation of web applications. When creating a Sitefinity form in version 8 or greater, under “Advanced Settings” you’ll be prompted to select which form option you want to utilize for your form; web forms or MVC. If your website was developed using Sitefinity 8 or a previous version, it may have been developed using the Sitefinity Web Form framework. You can make a selection based on your website’s development configuration, but if you are unsure which option applies to your website, your Client Service Manager can provide direction.
Form Validation
Last year, Vanguard published an article titled “Three Features in Sitefinity CMS that you Need to Be Using.” In the article, we outlined a feature in Sitefinity CMS that allows you to set validation for a field, such as your Email Address form field, so that an “@” is required as part of the form response. You can utilize this powerful feature to add additional forms of validation to other Sitefinity fields by selecting the field’s “Advanced” setting. For a full listing of validation formats, refer to this article.
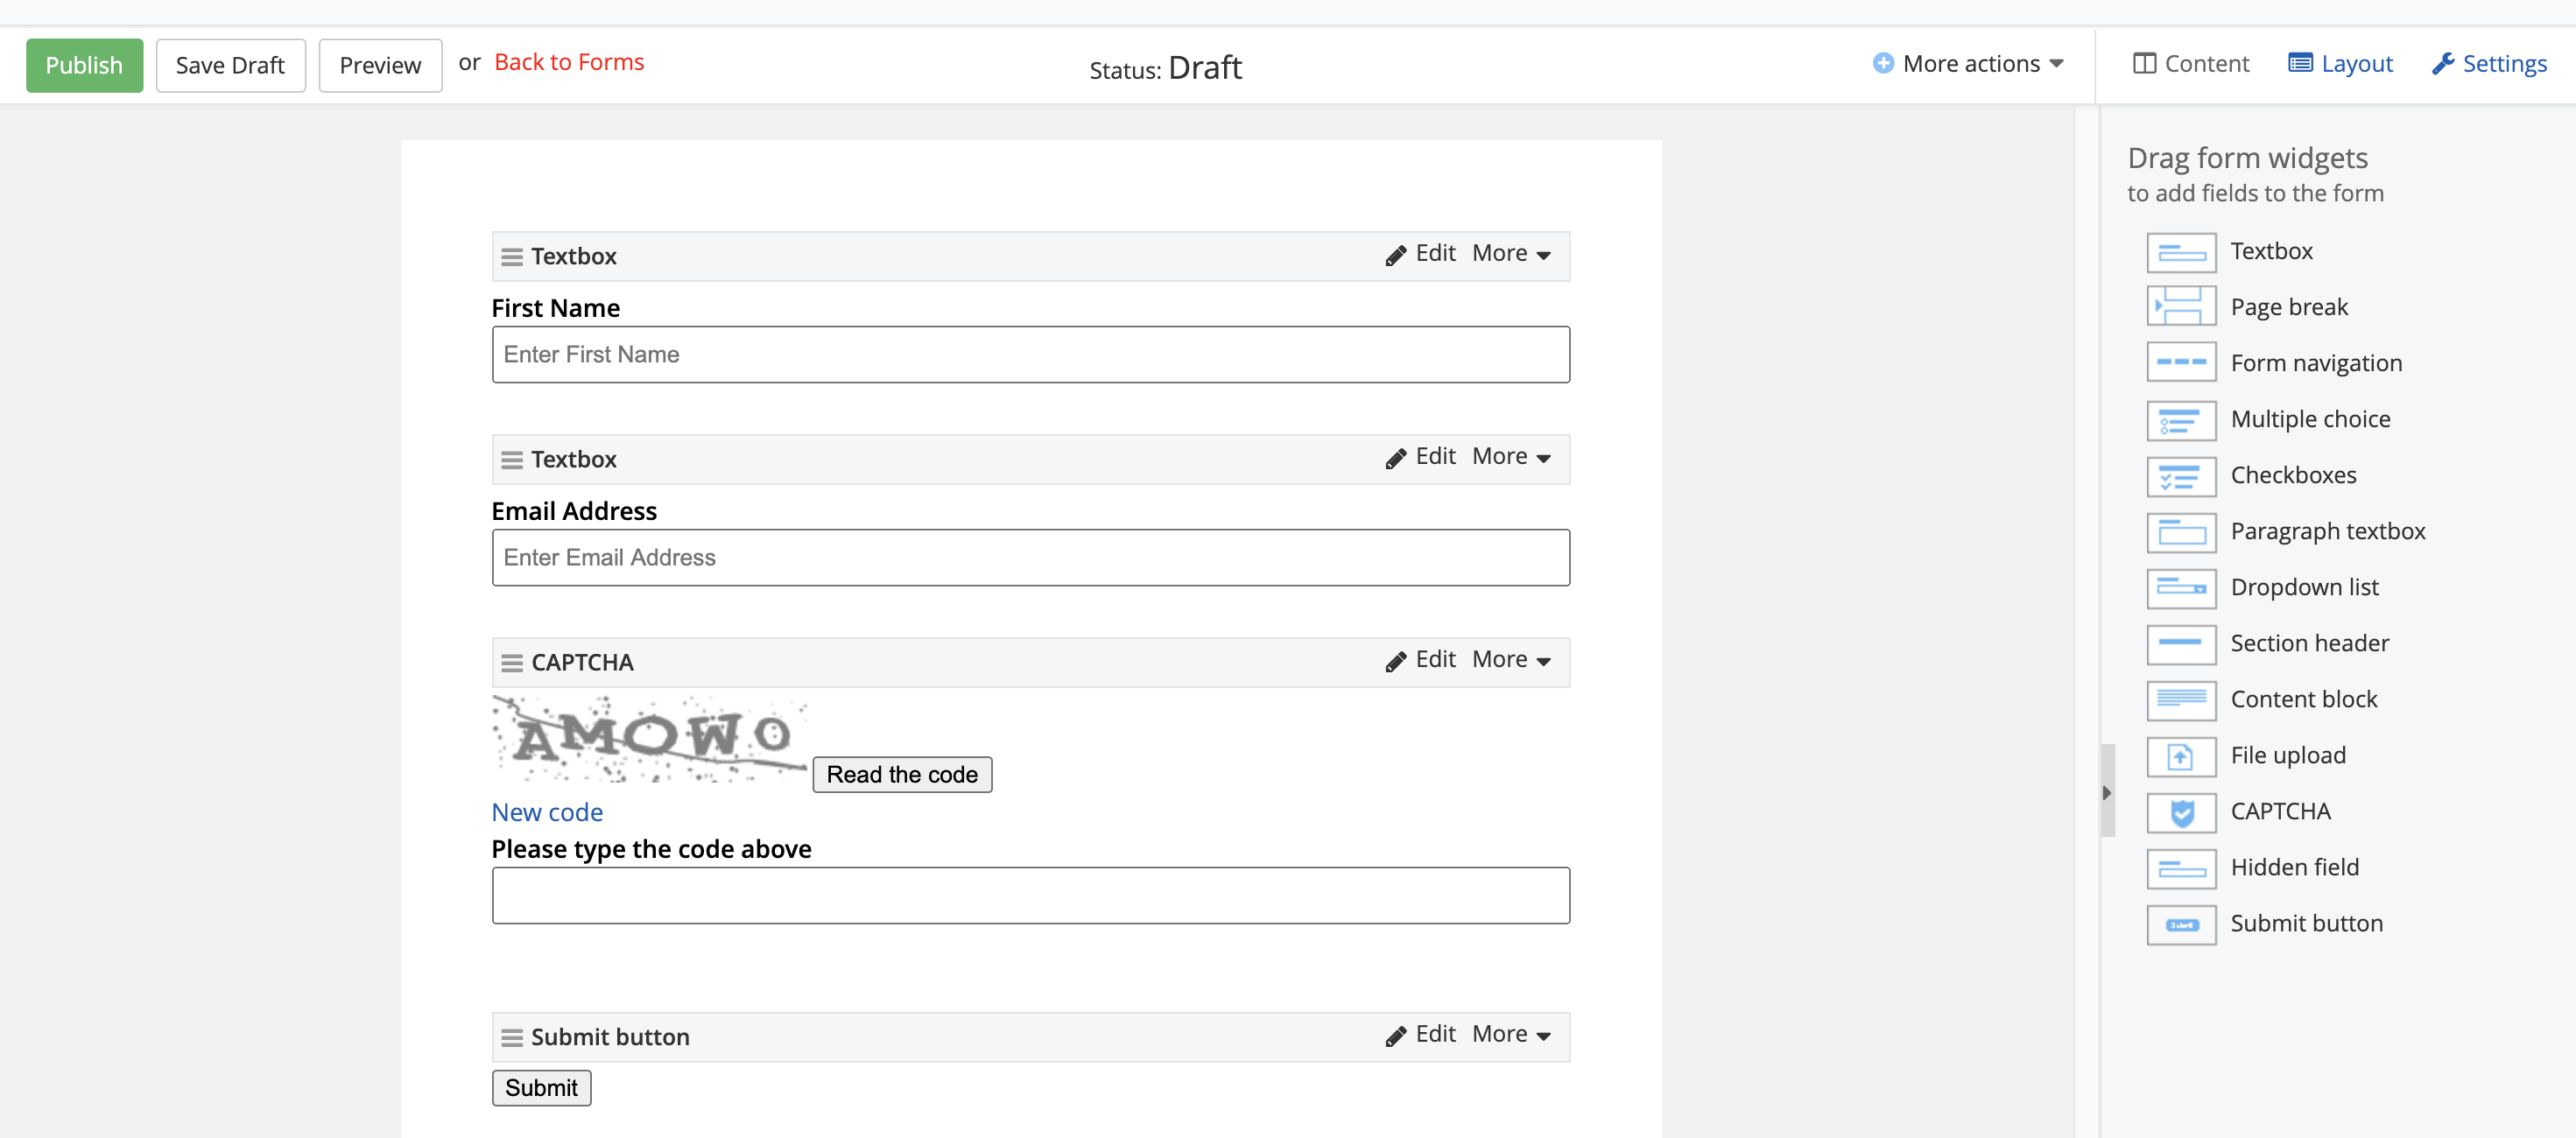
CAPTCHAS
To protect your form and website from spam, Sitefinity includes a powerful CAPTCHA field, which will require the user who submits the form to perform a short test to confirm a series of numerical and alphabetical values. You can also take this a step further and only require unauthenticated users (users who do not have or have not logged into your website) perform the CAPTCHA test. You can learn more about all of the available CAPTCHA options here.
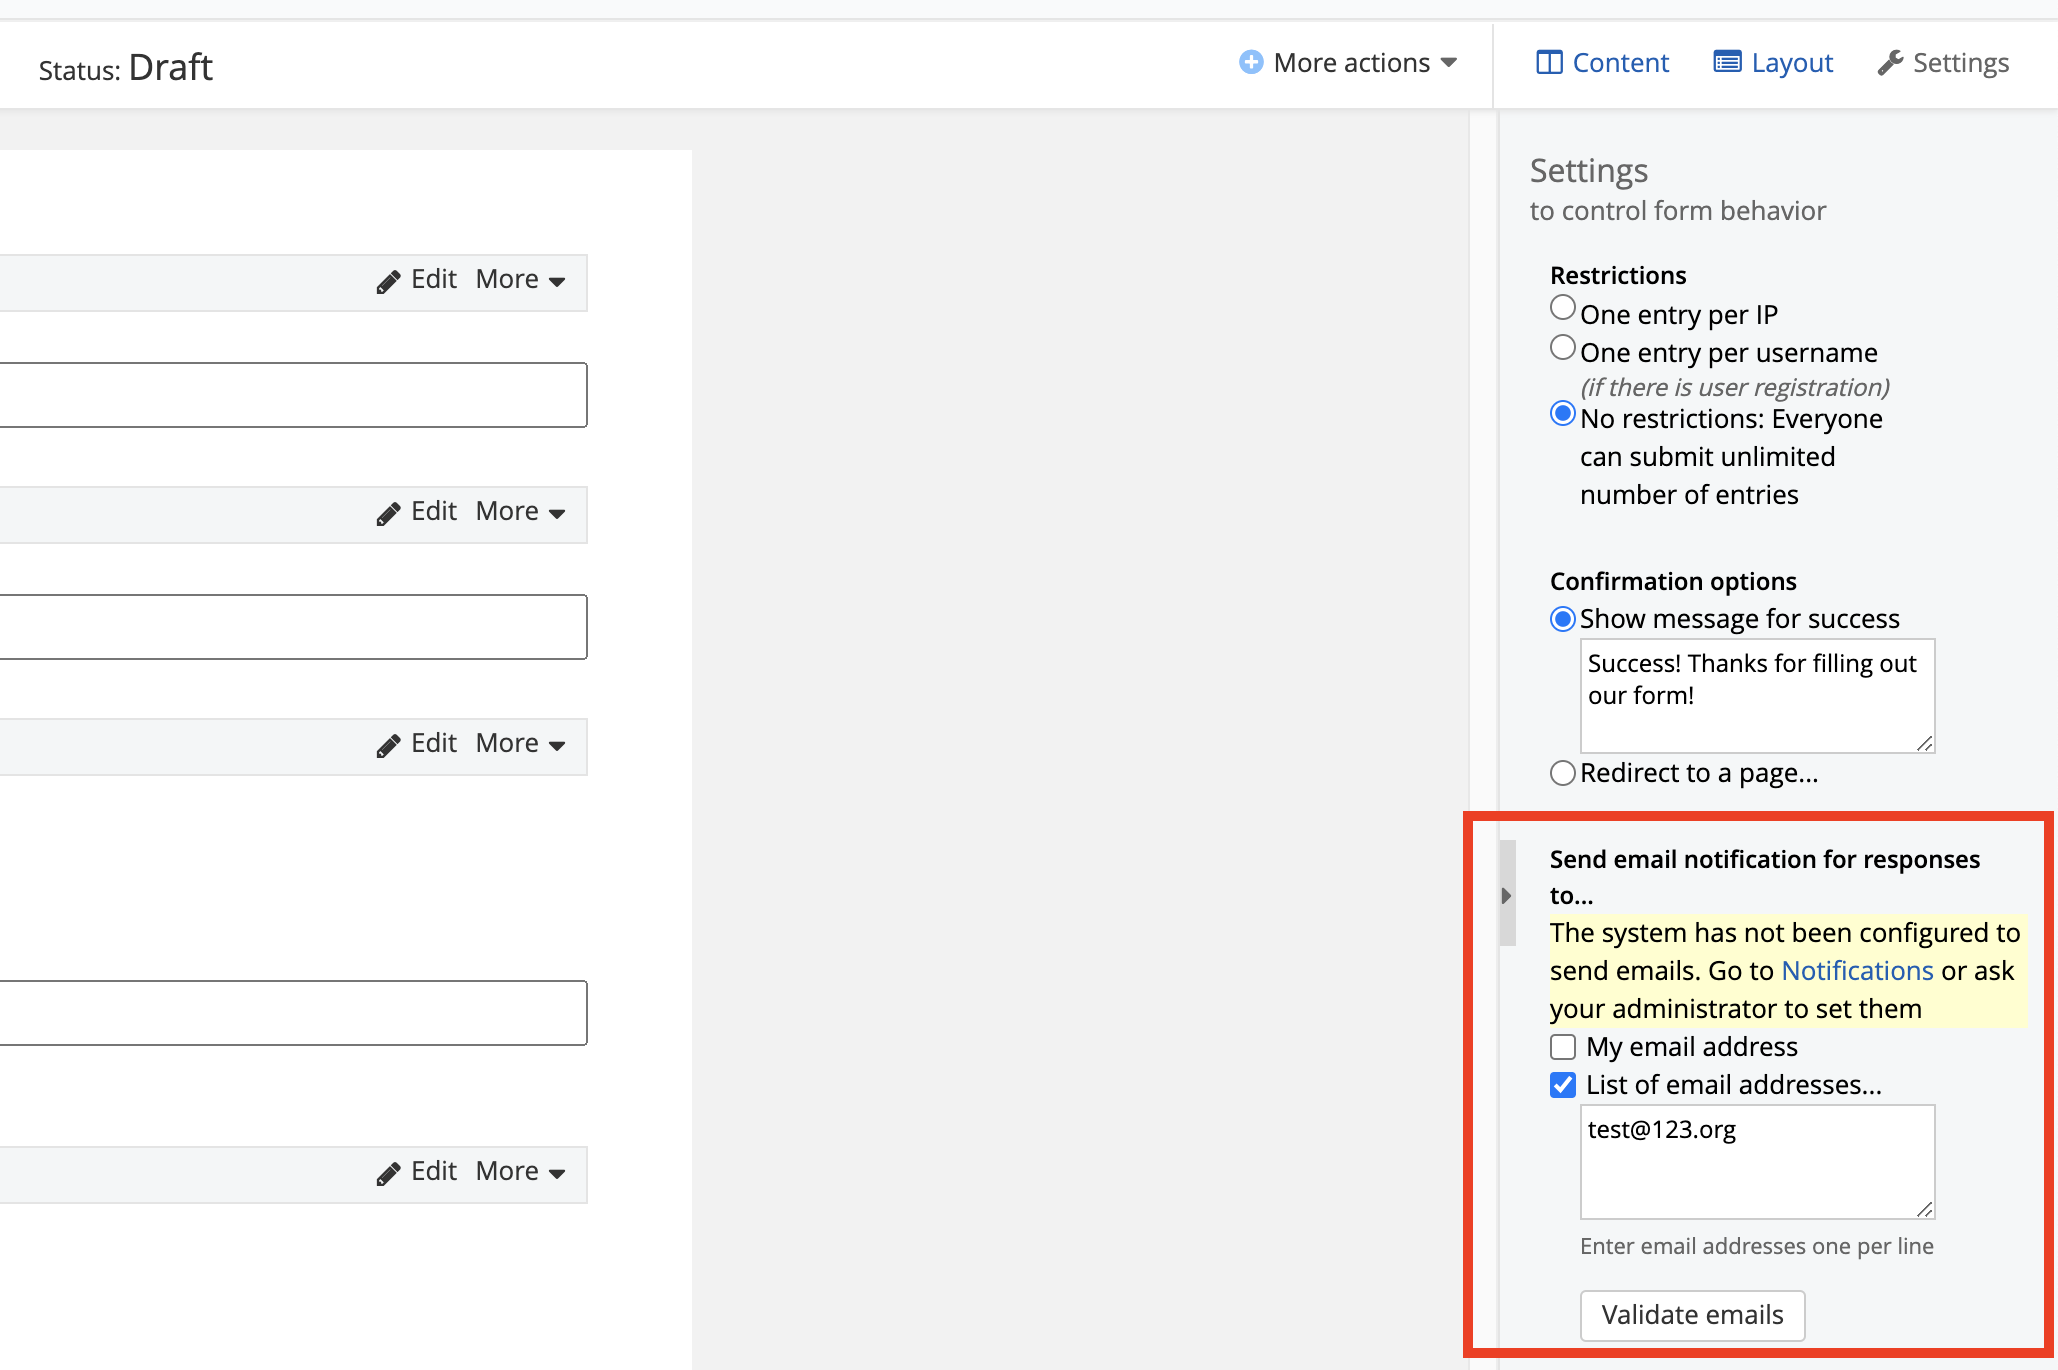
Email Notifications for Form Responses
Another feature that you can enable on all forms is the email notification alert setting. When you create a Sitefinity form, you’ll want to notify staff that a form entry has been submitted. To do so, open the form in Edit mode, select the “Settings” tab on the upper right-hand corner of your screen, and under the “Send email notification for responses to...” heading, enter all email address that should receive a notification when the form is submitted. Once you enter your email address, select the “Validate Email” button.
Thank You Page
When you create a Sitefinity form, the default confirmation message will display on the same page that the user submitted the form from. However, you have the option to change this and redirect the user to a custom thank you page. To add a custom redirect page, open the form in edit mode, select the “Settings” tab on the upper right-hand corner of your screen, select the “Redirect to a page…” option. You’ll need to insert the full website URL of your thank you page, but this option will give you full control on where to redirect the user to, and what content you want the user to view after they successfully submit a form entry.
By utilizing the Sitefinity form builder, you’ll be able to rapidly create powerful and complex forms that will allow you to capture user form data. With each Sitefinity release, Progress continues to add features to its Form Builder such as the ability to break forms into multiple pages through its multi-page feature and the ability to insert specific form rules based on a user’s populated field input.
If you have any questions regarding Sitefinity CMS forms or any other specific feature, reach out to your Client Service Manager.
Vanguard Tips & Tricks
We provide helpful hints you never knew you needed for our clients. Check out "Vanguard Tips & Tricks" to learn quick and simple hacks to make managing your website easier than ever.
Configurable Settings when Creating a Sitefinity Form
One of Sitefinity’s most powerful features is its Form Builder. The Form Builder allows you as the website administrator to quickly create a form and capture information from you website visitors to learn more about them.
The advantage of utilizing the Form Builder is that Sitefinity CMS by default includes a wide array of configurable fields making the form creation process much more streamlined. Some of the included fields are;
- Textbox
- Radio Selection
- Dropdown List
- Date Selector
Although creating and configuring a form in Sitefinity can be done with a few mouse clicks, there are several configurable options that you need to know before creating your form.
MVC vs. Standard Web Forms
Sitefinity CMS introduced the MVC framework in its version 8 release. MVC is broken up into three elements; the “model,” “view,” and “controller.” This framework is built on ASP.NET and is utilized for the creation of web applications. When creating a Sitefinity form in version 8 or greater, under “Advanced Settings” you’ll be prompted to select which form option you want to utilize for your form; web forms or MVC. If your website was developed using Sitefinity 8 or a previous version, it may have been developed using the Sitefinity Web Form framework. You can make a selection based on your website’s development configuration, but if you are unsure which option applies to your website, your Client Service Manager can provide direction.
Form Validation
Last year, Vanguard published an article titled “Three Features in Sitefinity CMS that you Need to Be Using.” In the article, we outlined a feature in Sitefinity CMS that allows you to set validation for a field, such as your Email Address form field, so that an “@” is required as part of the form response. You can utilize this powerful feature to add additional forms of validation to other Sitefinity fields by selecting the field’s “Advanced” setting. For a full listing of validation formats, refer to this article.
CAPTCHAS
To protect your form and website from spam, Sitefinity includes a powerful CAPTCHA field, which will require the user who submits the form to perform a short test to confirm a series of numerical and alphabetical values. You can also take this a step further and only require unauthenticated users (users who do not have or have not logged into your website) perform the CAPTCHA test. You can learn more about all of the available CAPTCHA options here.
Email Notifications for Form Responses
Another feature that you can enable on all forms is the email notification alert setting. When you create a Sitefinity form, you’ll want to notify staff that a form entry has been submitted. To do so, open the form in Edit mode, select the “Settings” tab on the upper right-hand corner of your screen, and under the “Send email notification for responses to...” heading, enter all email address that should receive a notification when the form is submitted. Once you enter your email address, select the “Validate Email” button.
Thank You Page
When you create a Sitefinity form, the default confirmation message will display on the same page that the user submitted the form from. However, you have the option to change this and redirect the user to a custom thank you page. To add a custom redirect page, open the form in edit mode, select the “Settings” tab on the upper right-hand corner of your screen, select the “Redirect to a page…” option. You’ll need to insert the full website URL of your thank you page, but this option will give you full control on where to redirect the user to, and what content you want the user to view after they successfully submit a form entry.
By utilizing the Sitefinity form builder, you’ll be able to rapidly create powerful and complex forms that will allow you to capture user form data. With each Sitefinity release, Progress continues to add features to its Form Builder such as the ability to break forms into multiple pages through its multi-page feature and the ability to insert specific form rules based on a user’s populated field input.
If you have any questions regarding Sitefinity CMS forms or any other specific feature, reach out to your Client Service Manager.
Case Studies
Vanguard conducts thorough preliminary investigative work to ensure your website is built to cater specifically to your target audience and meet your organization’s goals. Check out some of the case studies on some of our most recent client success stories.


What Can Vanguard Do For You?
As your organization grows and evolves, your website should as well. Whether you are looking to generate more traffic, implement custom functionality, mobile compatibility, integrate your systems, or give your site a complete redesign, Vanguard Technology is your go-to web partner. Reach out to us with your current concerns with your website, and our experts will happily provide a solution.
Leave a commentOrder by
Newest on top Oldest on top