Quick Tips to Consider when Working with Sitefinity CMS
So, you’ve been using Sitefinity CMS for several years and know enough to do some damage (in a good way!). With your experience in the CMS, your peers have designated you as the Sitefinity CMS guru within your organization. If this is you, then
you likely already know that Sitefinity is a powerful and easy-to-use CMS that allows you to quickly create content by using a combination of content types and Sitefinity pages.
At Vanguard, we love to connect and talk Sitefinity CMS with our clients and when we converse, our clients learn something new and are equipped with even more Sitefinity-based knowledge.
Here are four quick tips to consider when working with Sitefinity CMS;
Tip 1 - Content Blocks and Paragraph Tags:
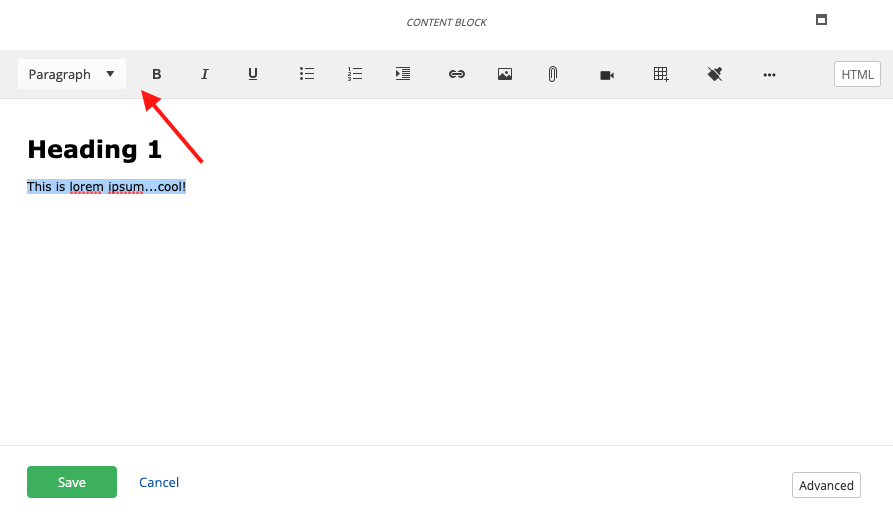
If you create content using the Sitefinity content block and notice that your paragraph spacing is uneven, and not matching other paragraph line spacing content, it’s likely because the content isn’t wrapped in a paragraph tag. It’s important to wrap all of your textual based content within a paragraph tag, not only because it is an HTML best practice, but also because it may cause formatting issues. To wrap content in a <p> tag (paragraph tag), highlight your text with your mouse cursor, and under the Sitefinity paragraph dropdown selector, use the “Paragraph” formatting option. Now, of course, this only applied to paragraph-based content, and not headings. You should continue to use the proper heading options based on your content needs.

Tip 2 - User Submitted Documents:
As referenced in a previous Tips and Tricks blog,
the Sitefinity form builder is powerful. It allows you to create complex forms with features such as dropdowns, radio selectors, captchas, and many more fields out of the box. One of the most widely used fields is the upload field, which allows you
to insert a document upload field to your form, which then accepts the uploading of documents as part of the form submission process.
To access user-submitted documents, navigate to – Sitefinity>Administration>User Files. From there, simply locate your form, which will reside in its folder, and you’ll be able to access all of the front-end users submitted documents.
Tip 3 - Searching for Documents and Image Assets:
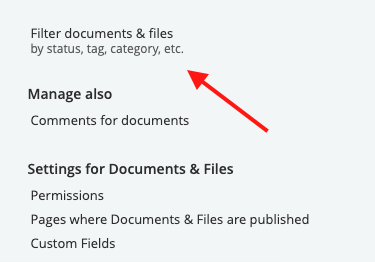
When you navigate to the Documents and Files or Images section of Sitefinity, you’ll redirect to a page that contains all of your assets organized into folders. From there, you can select the “Search” button at the top of your screen to search for your assets. However, in this view, you’re only allowed to search for Sitefinity folders and not the assets that reside within each folder. To search for all assets, simply navigate to the “Filter by Documents & Files” section, located on the bottom right-hand of your screen. You’ll then be able to search globally for any document or image.

Tip 4 – Additional and Friendly URLs
When creating a page, you may give it a descriptive title, which in return will generate your URL based on the specified title. For SEO and marketing purposes, you may want to highlight a more “friendlier” URL, especially if you plan to insert
or highlight a URL in an email, or some form of paper collateral. To create a friendly URL, navigate to – Pages>locate your page>Select the “Actions” under the actions column>Titles and Properties.
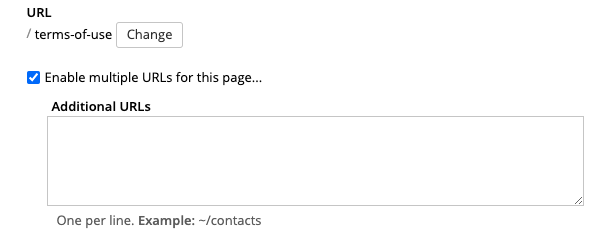
From there, you’ll redirect to the Sitefinity Titles and Properties screen. Under the URL option, select the “Enable multiple URLs for this page…” heading. Then, simply enter one or as many additional URLs as needed.
Please, note that you must properly format the URL to include a tilde character followed by a forward slash
E.g., ~/shorturl
When completed correctly, you can go from this:
www.example.com/thisisalonglonglongurl
to this:
www.example.com/shorturl

By utilizing these tips, you'll become more efficient when working with Sitefinity, increasing your productivity. If you'd like to learn more about Sitefinity or have a question about a specific feature, please reach out to your Project or Client Service Manager.