
Three Features in Sitefinity CMS that you Need to Be Using
So, you consider yourself a Sitefinity wiz, and have been utilizing the CMS for several years now, or maybe you are a novice looking to take advantage of all of the features that the CMS offers. Here are three features that you should begin using today when creating content.
Feature One - Don't Delete, Replace!
You've recently published a document, inserted a link to a page, and now your audience has access to the document. Perfect! This is a typical example of a content edit that is commonly made within the CMS. If you need to update the document to reflect a new version, don't delete it, replace it. If you were to delete the document, it will be removed from Sitefinity CMS and will result in a 404 error when a user selects if from a page. Instead, simply replace the document using the Sitefinity document replacement tool. Here are the steps needed, to replace a Sitefinity document;
- Navigate to Sitefinity>Content Types>Document & Files.
- Locate the library where your document resides and select it.
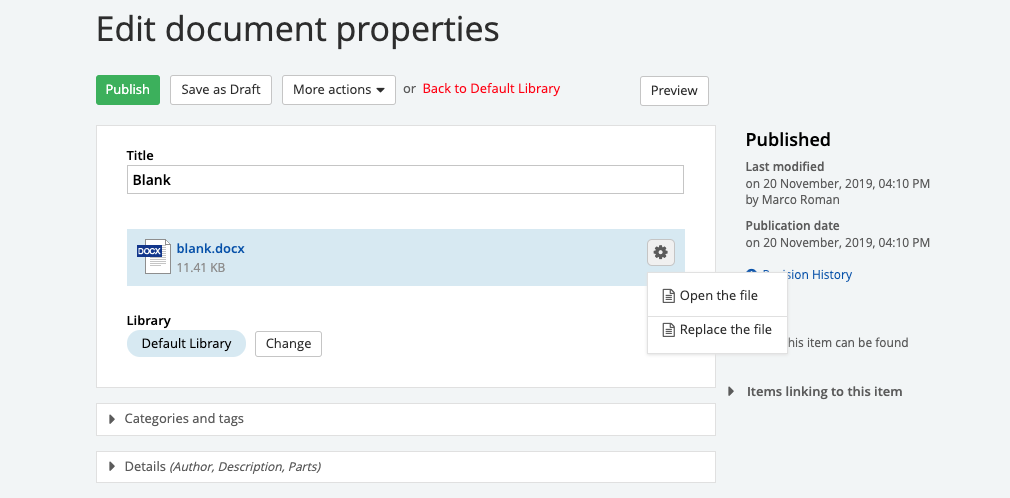
- Locate the document, and under the “Actions” tab, select “Edit Properties.”
- Select the gear icon and choose “Replace File.”
- Select a document from your computer, upload, and select “Publish.”
ow that you’ve successfully replaced a file, every reference to the file within your website will be updated, and the URL of such a document will redirect the user to the updated document version.
Feature Two – Require an Email Address on Your Form
You’ve created a form, and within a field, you require that a user enters an email address. You can certainly set the fields as “required,” but what if you want to add validation so that the user enters an email address, using a standard email address format? Here’s how to achieve that;
- Navigate to Sitefinity>Content Types>Forms.
- Locate your form and select the form so that you can edit its fields.
- Locate the field that you wish to add email validation to.
- Select the “Edit button.”
- Select “Advanced,” located on the bottom right-hand side of your screen.
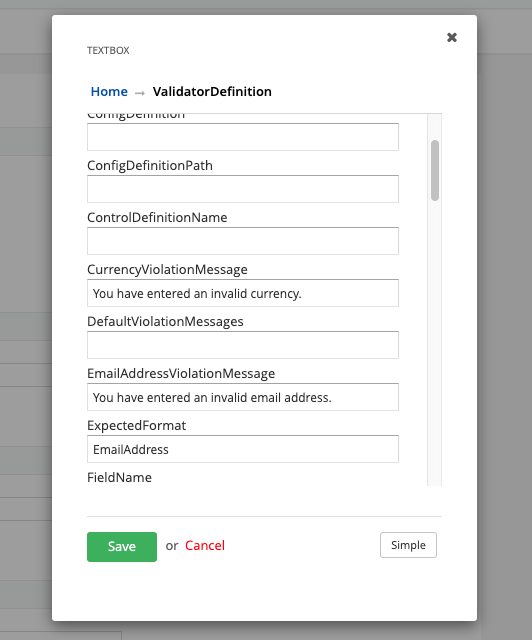
- Scroll to the bottom and select the “ValidatorDefiniton” button.
- Scroll to the top and select “ExpectedFormat.”
- Enter “EmailAddress” and select “Save.”
- Publish your updated form.
 Moving forward, Sitefinity will prompt the user to enter an email address in a valid format, such as thisismyemail@test.org.
Feature Three – Insert CSS Classes for Call to Actions
You've created a page and would like to call-out a specific piece of content so that your end-users perform an action. The problem is that your link isn't drawing much attention since it's a standard hyperlink with an underline. You can quickly turn your hyperlink, into a styled button. CSS classes are created by a Vanguard web developer and can be located on the formatting page that Vanguard created as part of your website redesign project.
Here's how to implement a button using a CSS class;
- Navigate to Sitefinity>Pages
- Locate your page and select the page to go into editing mode.
- Locate a Content block that requires a button. Keep in mind that you'll need to insert a hyperlink to implement the button.
- Within the content block, select "Edit." This will open Sitefinity's WYSIWYG editor.
- Highlight your link and select the "Hyperlink Manager" chain icon.
- Under "More Options," locate the "CSS Class" field.
- Insert your CSS class. E.g., button.
Behold! You've inserted a button, and it draws more attention to your content with the expected result of a higher call-to-action goal conversion. Be advised that you should ensure that a CSS class is available for your website.
Each feature above has its importance within the CMS and can tremendously help you accomplish your content needs. The end result of using these features is a better backend user experience, and better yet, a much more productive one.